4.1 Standard tables
Purpose
The 'Select variables' page allows you to customise the table so that you get only the data you need.
Each table contains up to six variables that can be selected. The one constant is 'time'. Other variables depend on the table and can range from 'regions' for demographic data, 'industry type' for business data and 'sex' for population data.
Navigation
To access the 'Select variables' page, click the table name or the Select variables link in the table metadata on the Search results or Browse page.
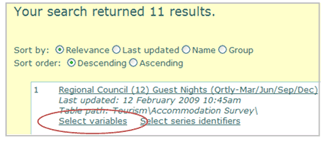
Figure 4.1 - Search result
Page example

Figure 5.2 - Example of Infoshare select variables page
Descriptions
The 'Select variables' page functions and their descriptions are listed below.
 - Denotes that at least one value from the list must be selected for that variable.
Select all - Selects and highlights all values in the variable list.
Clear selection - Un-selects all values in the variable list.
 - Click to sort by descending order from Z to A, or highest to lowest or latest to earliest.
 - Click to sort by ascending order from A to Z, or lowest to highest or earliest to latest.
Total: - Total number of values in the variable list.
Selected: - Shows the number of values that have been selected.
 - Click to sort by ascending order from A to Z, or lowest to highest or earliest to latest.
Search - Allows you to search for a particular value. Enter a word or the start of a word and click Find.
Text start - Tick the box to find all values starting with the text entered in the search box.
Number of selected data rows - Shows the total number of rows selected.
Number of selected data columns - Shows the total number of columns selected.
Number of selected cells - Shows the total number of cells selected.
 - Opens the data options page. (See section 5: Table layout for more information.)
 - Dropdown menu for output format options.
 - Output to format chosen in dropdown menu.
Steps
To customise your table:
- Select values from each required variable list.
- Click Options button to change the layout of the table before outputting (optional).
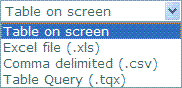
- Use the dropdown menu to select the output format. The output options include:
 Table on screen - displays a table on screen from the chosen values. (See section 5.2: View table for more information.)
Excel file (.xls) format - downloads the chosen values as an Excel file with alternative layout. (See section 5.2: View table for more information.)
Table query (.tqx) - downloads the chosen values as a Table query file for re running using 'Load query'. (See section 6: Load query for more information.)
- Click Go to output the table in the format chosen in the dropdown menu.
Tips
Select a continuous range of values - using your keyboard press the 'Tab' key until you reach the relevant variable box, then hold the 'Shift' key and use the arrow key to move to the next value. Continue to move down the list, holding the 'Shift' key until all the relevant values have been selected.
Select all variables - a quick way to select all variables is by clicking Select all. Clicking Clear selection will unselect all values in the list.
You can select values from a variable list by:
clicking on the Select all link to select all the values
clicking on one value then holding down SHIFT and clicking on another value to select a continuous range of values
clicking on one value then holding down CTRL and clicking on another value to select non-adjacent values
clicking on one value then dragging in the variable list to highlight a continuous range of values.
To quickly find a value, type part of, or a complete word in the search box and click 'Find'. The word or words that match your search criteria will be highlighted. To perform a new search first clear the selections to un-select the highlighted values.

4.2 Time series identifier tables
Purpose
The 'Select series identifiers' page allows you to refine your time series identifier search by selecting specific identifiers and time periods. Additional selection criteria may be specified by selecting the 'Options' button.
Navigation
To access the 'Select series identifier' page, click on the link Select series identifiers in the table metadata on the 'Search results for time series identifier' page. This option will only be shown if a time series identifier search is performed. (See section 3.3: Time series identifier search for more information.)
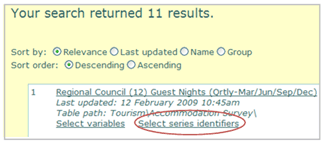
Figure 4.2 - Time series identifiers search result
Page example
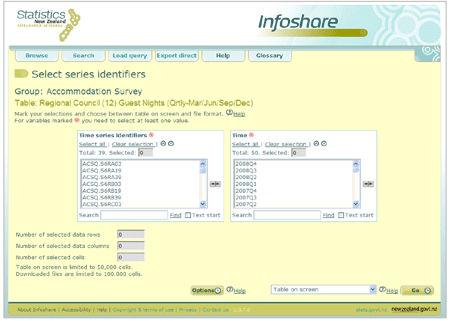
Figure 4.2.1 - Select time series identifiers page
Descriptions
Functions are the same as for standard tables. (See section 4.1: Standard tables for more information.) The only addition is the output option 'Search file (.sch)' in the dropdown menu. (See section 7: Export direct for more information.)
Steps
To customise your table:
- Select a value or number of values from the 'Time series identifiers' list.
- Select a value or number of values from the 'Time' list.
- Click the Options button to change the layout of the table before outputting (optional)
- Use the dropdown menu to select the output format, for example 'Table on screen'.
- Click Go to output the table in the format chosen in the dropdown menu
- Note: Only the series identifiers that match your search criteria will be listed.
Technical information
Time series identifiers
A Statistics New Zealand time series identifier is a database identifier for a type of statistic produced by Statistics New Zealand and includes the time frequency for which this statistic is produced.
Series identifiers may have up to 20 characters - for example, TIMM.SCXBR0901110000Q. Characters in the identifier are:
1-3: Data type (e.g. TIM=Imports)
4: Frequency (e.g. M=monthly)
5: Delimiter (".")
6: Separator
7-8: Code level identifier (e.g. CX=10 digit)
9-10: Country code (e.g. BR=Brazil)
11-20: 10 digit item code (This could be 2, 4, 6, 10 or none)
21: Observation (e.g. Q=Quantity)
Time
A time period with the year denoted by the first four characters. The suffix M01-M12 after the year denotes months 1-12 of the year. The suffix Q1-Q4 after the year denotes quarters 1-4 of the year.
Warning message
A warning message may appear to warn you have selected too many columns or rows as shown in figure 4.2.2. Tables on screen are limited to 50,000 cells and downloaded tables are limited to 100,000 cells.

Figure 4.2.2 - Warning message for too many columns selected
4.3 Overseas trade tables
Purpose
The Select variables - Harmonised Trade page allows you to customise a detailed overseas trade table. On this page you can select data type, observation, countries or country groups, and harmonised system codes (HS codes).
Navigation
To access the 'Select variables - Harmonised Trade' page, select the link for the overseas trade select variables page on the 'Search' page which is available from the Search tab, or, expand the browse tree from the 'Browse' page and select from one of the following table in the list:
- Export + re-exports - Commodities by country
- Exports - Commodities by country
- Imports - Commodities by country
- Re-exports - Commodities by country
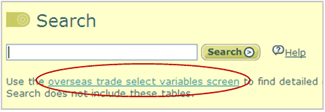
Figure 4.3 - Search page
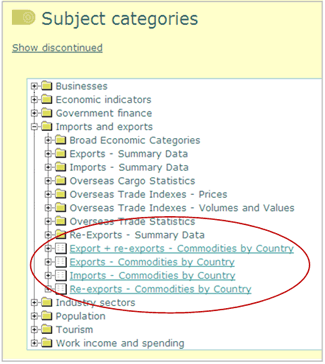
Figure 4.3.1 - Browse tree showing overseas trade
Page example

Figure 4.3.2 - Select variables 'Trade' page
Descriptions
The 'Select variables - Harmonised Trade' page functions and their descriptions are listed below.
Data types - Describes the type of trade data to retrieve for the country(s) selected. Options are:
Imports include commodities brought into New Zealand from a foreign country.
Exports include commodities sent from New Zealand to another country.
Re-exports are exports of commodities that have been imported and have had no further processing or transformation since being imported.
Total Exports (exports + re-exports) combines the totals of these two options into one value total exports.
Observations - Options are:
Quantity - number weight or volume of commodities.
Cost including insurance and freight (CIF) - is the cost of goods, insurance and freight to the importer.
Value for duty (VFD) - is the cost of goods exclusive of any associated incidental costs. This is approximately equal to the free on board (FOB) value for exported goods.
Free on board (FOB) - is the price paid by the overseas purchaser. It excludes the cost of insurance and freight.
All values are recorded in New Zealand dollars.
Countries - List of countries the commodities were imported from or exported to.
Groups - A country group to which specified countries belong. Hold the cursor over the group name to see a list of countries within the group.
Selected countries - Countries or country groups to be included in the table.
Search - Allows you to search for a particular value. Enter a word or the start of a word and click Find.
Text start - Tick the box to find all values starting with the text entered in the search box.
HS Code - Harmonised system codes. A hierarchy of codes that belong to an internationally standardised system for classifying traded products, developed and maintained by the World Customs Organisation (WCO). Maximum allowed 150.
Selected HS codes - HS Codes to be used as selection criteria for data retrieval.
Show codes - Displays country code in addition to the country name.
 - Adds the highlighted value(s) to the selected list.
 - Removes the highlighted value(s) from the selected list.
Total number of data columns selected - Total number of observation, country and HS code combinations selected.
- Click to open the data options page to select time periods and change the table layout prior to output.
Steps
To customise a detailed trade table:
- Select a Data type by clicking on the radio button.
- Select one or more observations by clicking the checkbox(es). (Only the observations relevant to the selected data type can be chosen.)
- Select a country or country group by clicking on the relevant tab.
- Select one or more countries or country groups.
- Click Add to add your highlighted values to the Selected countries list box. You may repeat steps 3 and 4 until you have selected all the countries you require for your table.
- Select one or more HS Codes by clicking on the relevant checkbox:
If you wish to select an HS Code at the HS2 level, then tick the checkbox at the 2 digit code level.
If you wish to select an HS Code at the HS4 level click  to expand level 2 and then select the checkbox at the 4 digit code level.
If you wish to select an HS Code at the HS6 level click to expand level 4 and then select the checkbox at the 6 digit code level.
If you wish to select an HS Code at the HS10 level click to expand level 6 and then select the checkbox at the 10 digit code level.
- If you wish to search for one or more HS codes, you may select the Search tab on the HS codes box and:
Type the HS code or description required in the 'Search' field and click the Find function, then select the required code by clicking and highlighting it.
Type the first few numbers of the HS Code you wish to search for and select the Text start checkbox, then click the Find. All HS codes starting with those numbers will be returned. You can then select one or more codes by clicking and highlighting them. '+' or '++' can be used to replace a number(s) within the HS Code.
- Click Add to add your checked values to the Selected HS codes list box. You may repeat steps 5-7 until you have selected all the HS codes you require for your table.
- Click Go
- The Select data options page will be displayed, allowing you to select time periods and layout options for your table.
- If you have clicked Go without selecting any country or HS codes then totals for all countries and HS codes will be displayed when you view or download the table.
If you have selected more than 100,000 cells then the following message will be displayed.
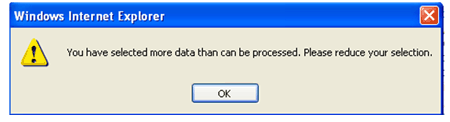
- Click OK and reduce your selections.
- If you have selected more than 50,000 cells then the following message will be displayed.

- Click OK to continue or Cancel and reduce your selections.
- Clicking OK will display the 'Select data options' page, allowing you to select time periods and layout options for your table.
Tips
Select one or more countries or country groups by either:
Holding down the Ctrl key on your keyboard and clicking on and highlighting the relevant country/countries or group(s) by scrolling up or down the country list.
Type the country required in the 'Search' field and click Find, then select the country by clicking on it.
Type the first few letters of the country you wish to search for and select the Text start checkbox, then click Find, then select the country by clicking on it.
To scroll down the list to a country starting with a particular letter click within the list then type this letter on your keyboard to highlight the country. Continue to type this letter to move through the countries starting with this letter.